How to Remove Grime from Your Shower: A Step-by-Step Guide
Grime buildup in showers is a common problem that many people encounter. Over time, soap scum, body oils, mineral deposits, and dirt can accumulate on the surfaces, making the shower look dirty and uninviting. The presence of Grime affects the aesthetic appeal and poses potential health risks.
Regular cleaning and maintenance of your shower are essential to ensure a hygienic and pleasant bathing experience. By incorporating a cleaning routine into your schedule, you can prevent Grime from building up and maintain a fresh and sparkling shower.
The benefits of a clean and grime-free shower extend beyond just appearances. Firstly, a clean shower promotes good hygiene by eliminating bacteria, germs, and other microorganisms that thrive in dirty environments. This helps safeguard your health and the health of your loved ones. It can also prolong the lifespan of your shower fixtures and surfaces, preventing unnecessary wear and tear.
Understanding Grime
Grime, an unsightly accumulation of dirt, soap residue, body oils, and mineral deposits, is a common nuisance in showers. It can turn a once sparkling space into a dingy and uninviting environment. To effectively combat Grime and maintain a clean shower, it’s crucial to understand its nature, causes, and potential consequences.
Grime, often characterized by a greasy or sticky texture, forms over time due to regular use. Soap scum, a common component of Grime, is formed when soap combines with minerals in the water. This mixture can adhere to shower walls, floors, fixtures, and curtains. Additionally, body oils, dead skin cells, and dirt contribute to the buildup, making the surfaces look dirty and dull.
Apart from its visual impact, Grime can pose potential health risks. When addressed, Grime becomes a breeding ground for bacteria, germs, and other microorganisms. These microorganisms can lead to skin infections, respiratory problems, and allergies. The risks are even more significant for individuals with compromised immune systems or respiratory conditions. A shower’s warm and moist environment provides an ideal habitat for these harmful pathogens to thrive and multiply.

Gathering the Necessary Supplies
To effectively remove Grime from your shower, gathering the necessary cleaning supplies before you begin is important. Having the right tools and products on hand will make cleaning more efficient and ensure optimal results. Here is a list of essential supplies to consider:
- Cleaning solutions: Choose a suitable cleaner based on the type of Grime and the material of your shower surfaces. Standard options include all-purpose cleaners, bathroom cleaners, or specific grime-fighting formulas. Look for products that tackle soap scum, mineral deposits, and hard water stains.
- Scrub brushes: Invest in various encounters with different bristle strengths and sizes. Soft-bristle meetings are ideal for delicate surfaces, while more challenging bristles can tackle stubborn Grime on tiles or grout lines. Consider using a long-handled brush for hard-to-reach areas.
- Microfiber cloths: These highly absorbent, lint-free cloths are excellent for wiping down surfaces and achieving streak-free results. They are gentle enough to use on most shower materials and can be washed and reused.
- Gloves: Wear rubber or latex gloves to protect your hands from harsh chemicals. Opt for a comfortable pair that allows you to maintain a firm grip on your cleaning tools.
- Sponges or scrub pads: Use these gently scrub and wipe down surfaces. Choose non-abrasive options to avoid damaging your shower fixtures or finishes.
- Eco-friendly alternatives: Consider making your own if you prefer non-toxic and environmentally friendly cleaning solutions. Ingredients such as baking soda, white vinegar, lemon juice, and hydrogen peroxide can remove Grime without harsh chemicals.
- Grime-fighting extras: Depending on the severity of the Grime, you may want additional tools or products. A pumice stone can help remove tough mineral deposits, while a toothbrush can target Grime in hard-to-reach corners or around fixtures.
Several options regarding specific products or ingredients work well for removing Grime. In addition, lemon juice is a natural acid that can cut through Grime and leave a fresh scent. Finally, hydrogen peroxide is known for its disinfecting properties, making it a suitable choice for eliminating bacteria.
Gathering the necessary cleaning supplies, including eco-friendly alternatives and specific grime-fighting products, you’ll be well-equipped to remove Grime from your shower. The following section will explore the steps and techniques required for a thorough cleaning process.
Preparing the Shower for Cleaning
Before diving into the task of removing Grime from your shower, it’s essential to prepare the area properly. Pre-cleaning preparation sets the stage for a more effective and efficient cleaning process. Here’s why it’s important and how to go about it:
Importance of Pre-Cleaning Preparation
Taking the time to prepare your shower before cleaning ensures you can access all areas easily and reduces the risk of damaging surfaces or fixtures. It also allows you to focus solely on removing Grime without the distraction of personal items or accessories. By clearing the space, you create a clutter-free environment that enables thorough cleaning and prevents any potential mishaps.

Step-by-Step Instructions for Removing Personal Items and Accessories
- Remove personal items: Take out all toiletries, bottles, soap dishes, and any other personal items from the shower area. Please place them in a safe location outside the bathroom.
- Clear the shower floor: Pick up bath mats, rugs, and other floor coverings. Shake them out or launder them according to the care instructions.
- Take down shower curtains: If you have a shower curtain, detach it from the rings or hooks and remove it from the shower rod. Check the label for washing instructions, and clean it accordingly.
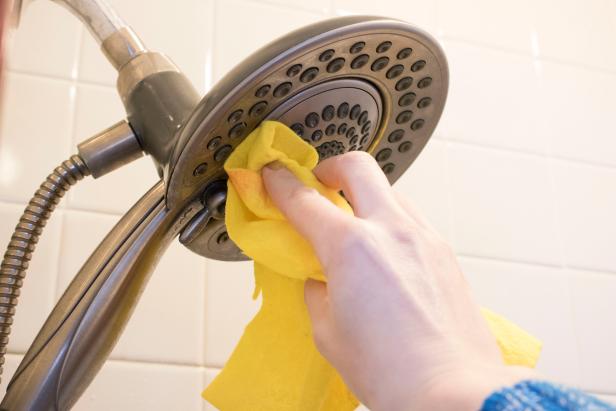
- Remove detachable showerheads or handheld sprayers: If possible, detach these accessories to facilitate better access during the cleaning process. Follow the manufacturer’s instructions for removal and reattachment.
Tips for Protecting Sensitive Surfaces During the Cleaning Process
- Cover light fixtures: If you have any delicate or sensitive institutions, such as decorative metal accents or brushed nickel finishes, consider covering them with a soft cloth or plastic wrap to protect them from any potential damage or exposure to cleaning agents.
- Test cleaning products: Before using any cleaning product or solution on your shower surfaces, perform a small patch test in an inconspicuous area. This ensures that the product won’t cause any discoloration or damage.
- Use caution with abrasive tools: If you’re using scrub brushes or pads, be mindful of the surface you’re scrubbing. Avoid using abrasive tools on delicate materials like acrylic or fiberglass. Opt for softer brushes or sponges instead.
Following these step-by-step instructions and taking precautions to protect sensitive surfaces can ensure a smooth and effective cleaning process. In addition, preparing your shower area before tackling the Grime ensures that you have a clear space to work with and minimizes the chances of any accidental damage. The following section will explore the step-by-step guide for removing Grime and restoring shine to your shower.
Step-by-Step Guide to Removing Grime
Ready to tackle the Grime in your shower? Follow this step-by-step guide to effectively remove dirt and restore the shine to your shower surfaces:
Step 1: Pre-rinsing the Shower
Start by giving your shower a thorough pre-rinse. Then, use warm water to wet all the surfaces, including walls, floors, and fixtures. This helps loosen any loose dirt or debris and prepares the surfaces for cleaning.
Step 2: Applying a Cleaning Solution
Choose a suitable cleaning solution based on your shower’s material and the type of Grime you’re dealing with. Then, spray or apply the cleaner to the surfaces, ensuring even coverage. Allow the cleaning solution to sit for a few minutes to penetrate and break down the Grime.
Step 3: Scrubbing the Surfaces
Armed with a scrub brush or sponge, start systematically scrubbing the surfaces—work from top to bottom, focusing on one section at a time. Apply moderate pressure and use circular or back-and-forth motions to dislodge the Grime. Pay special attention to areas prone to buildup, such as corners, tile grout, and shower fixtures.
Step 4: Paying Attention to Problem Areas
If you encounter stubborn Grime or stains that aren’t easily removed with regular scrubbing, it’s time to bring out the big guns. Use specific grime-fighting products or ingredients like baking soda paste or vinegar solution for targeted cleaning. Apply these solutions to problem areas, let them sit for a few minutes, and then scrub gently to remove the stubborn Grime.
Step 5: Rinsing and Dry the Shower
Once you’ve scrubbed all the surfaces, it’s time to rinse off the cleaning solution. Use warm water to thoroughly rinse the shower, ensuring that no cleaning residue is left behind. Pay attention to hard-to-reach areas to provide a complete rinse. After rinsing, use a squeegee or a microfiber cloth to remove excess water and speed up drying. This helps prevent water spots and ensures a streak-free finish.
Following these step-by-step instructions, you can effectively remove Grime from your shower and achieve a fresh and clean appearance. Remember to work systematically, take your time, and be thorough in your cleaning efforts. With each step, you’ll witness the transformation of your shower from grime-covered to sparkling clean.
Tackling Stubborn Grime
Sometimes, more than ordinary cleaning methods may be needed to eliminate stubborn stains and grime buildup in your shower. However, you can effectively conquer even the toughest Grime with the proper techniques and cleaning agents. Here’s how:
Techniques for Dealing with Tough Stains and Grime Buildup
When faced with stubborn Grime, it’s essential to be persistent and employ targeted cleaning techniques. Using a toothbrush or a small scrub brush can help you get into tight corners and crevices. Applying extra pressure while scrubbing can also help break down the Grime.
Introduce Effective Methods such as Baking Soda Paste or Vinegar Solution.
Baking soda and vinegar are powerful natural cleaners that can remove stubborn Grime. Mix baking soda with water and apply a paste to the affected areas. Let it sit for a few minutes, then scrub gently. Conversely, vinegar can be used as a solution or sprayed directly onto the Grime. Again, allow it to sit for a while before scrubbing.
Provide Safety Precautions for Using Harsher Cleaning Agents.
While mild and natural cleaning solutions are generally safe, there may be instances where harsher chemicals are necessary to tackle stubborn Grime. If you decide to use such products, following safety precautions is essential. Wear gloves, work in a well-ventilated area, and avoid mixing different chemicals. Always read and follow the instructions provided by the manufacturer.
You can effectively tackle even the most stubborn Grime in your shower by implementing these techniques and utilizing effective methods like baking soda paste or vinegar solution. Remember to prioritize your safety by taking precautions when using harsher cleaning agents. With perseverance and the right tools, you’ll achieve a sparkling clean shower free from any remnants of stubborn Grime.
Conclusion
Maintaining a clean shower enhances the aesthetic appeal of your bathroom and contributes to a healthier home environment. Following the steps outlined in this guide and adopting preventive measures, you can enjoy a grime-free shower that feels refreshing and inviting whenever you step in.
Remember, the benefits of a clean and grime-free shower go beyond appearances. A clean shower reduces the risk of mold and mildew growth, prevents the spread of germs, and enhances the overall hygiene of your home. So, make it a priority to incorporate regular cleaning and preventive maintenance into your routine.
With the knowledge and tools at your disposal, you can transform your shower into a pristine oasis. So take the first step today and enjoy the rewards of a clean and grime-free shower.